Use these instructions to learn how to use your Stratux and get it up and running quickly
Overview of "Standard Stratux" - receive targets only
- Stratux 2 "Standard Stratux" is developed by an open source community.
- Stratux 2 "Standard Stratux" receives (RX):
- ADS-L targets,
- ADS-B targets,
- OGN (Open Glider Network),
- PAW (PilotAware),
- Flying ad-hoc Networks (FANET) and
- Flarm targets.
- This version of Stratux does not send your own position to others.
- contains AHRS sensor to support artificial horizon
- contains barometric pressure sensor to not rely on inaccurate GPS altitude
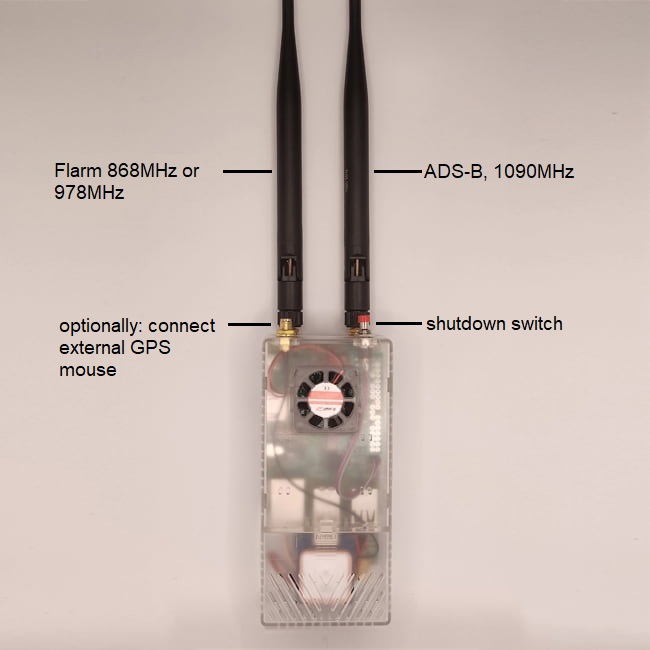
- Stratux will be delivered with 3 antennas, while 2 are in use at same time to receive ADS-B and (OGN) Flarm targets
- The long antenna without any description (two rings at the antenna end) must be mounted on the left as it is optimized for Flarm’s 868MHz frequency (European version), US and Canada use the 978MHz antenna instead on the left.
- The 2nd long antenna must be mounted on the right to receive ADS-B targets. This antenna has one ring at the end and a 1090MHz printing
- contains built-in GPS mouse but an option to connect an additional external GPS mouse.
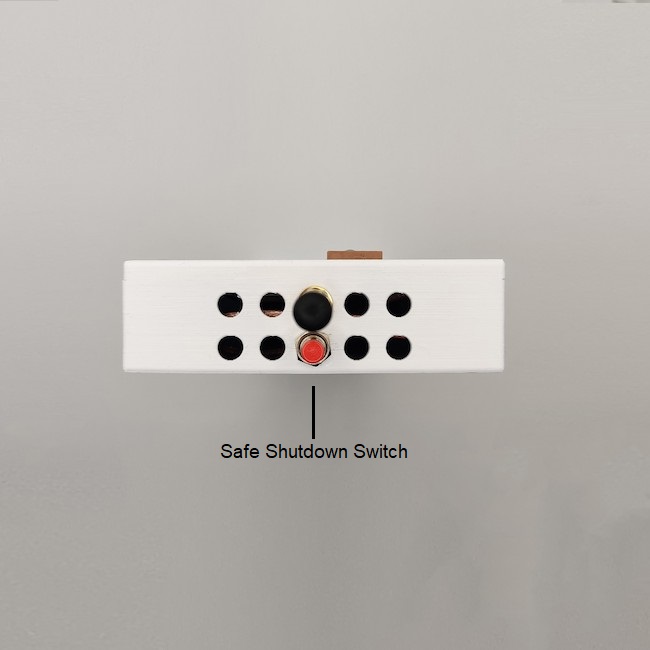
- Since Raspberry PI/ Stratux does not contain a shutdown switch out of the box, we modified the device. Pressing the red switch for one second triggers the command to shut down Stratux safely
- An additional feature is the pre-installed OpenFlightMap Europe and/or VFR Sectional Charts US to be shown in the Stratux web interface. Those should be used for a quick overview only as maps are not updated on frequently basis.
How to start with Stratux 2? - you can upgrade Stratux 2 by using a standalone OGN Flarm dongle to send your aircraft's position to others
- shutdown switch is deprecated since you can disconnect Stratux from the power supply without any damage of the device
Overview of "Classic Stratux" - with capability to transmit your aircrafts position
- Stratux 3 "Classic Stratux" is developed by an open source community.
- Stratux 3 "Classic Stratux" receives (RX):
- ADS-L targets,
- ADS-B targets,
- OGN (Open Glider Network),
- PAW (PilotAware),
- Flying ad-hoc Networks (FANET) and
- Flarm targets.
- But also transmits (TX) its own location through:
- ADS-L, and
- Open Glider Tracking Protocol (OGNTP), and
- Flying ad-hoc Networks (FANET), and
- PilotAware (PAW), or
- Flarm
- The “original” Stratux case does not have a connection for a suction cup holder, but can use either loop cable ties or a velcro strap to mount Stratux on top of the glare shield
- However, our 2.0 Edition of the Stratux 3 case is optimized and includes mounts for 4 suction cups to attach the Stratux e.g. vertically to a window.
- Material is 3D printed in PET-G.
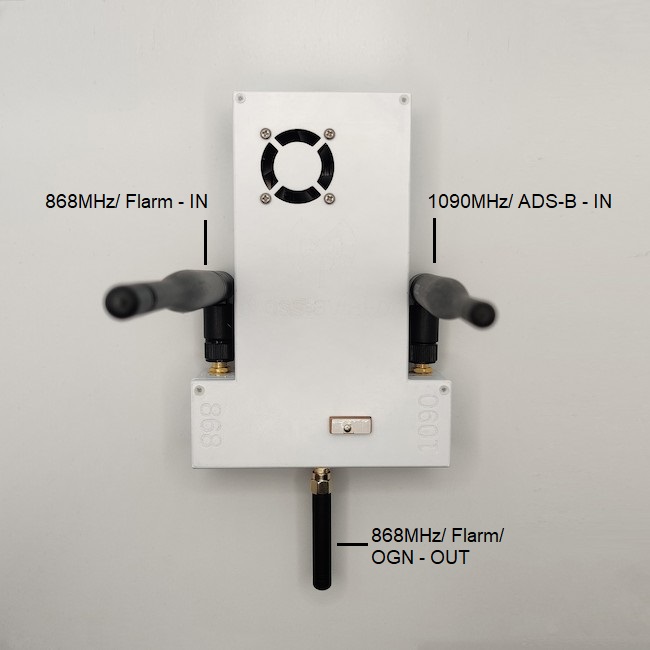
- Stratux has 3 antennas to receive ADS-B and OGN Flarm
- The long antenna without any description (two rings at the antenna end) must be mounted on the left as it is optimized for Flarm’s 868MHz frequency (European version), US and Canada use the 978MHz antenna on the left.
- The 2nd long antenna must be mounted on the right to receive ADS-B targets. This antenna has one ring at the end and a 1090MHz printing.
- The 3rd antenna is the smallest and must be mounted at the bottom, above the safe shutdown switch. It is designed to send Stratux’ own location to other OGN Flarm receivers.
- Stratux 3 contains a build-in GPS NEO M8N antenna
- contains AHRS sensor to support artificial horizon
- It is important that Stratux 3 (T-Beam/ T-Motion) contains a barometric pressure sensor (BMP280), otherwise you will send inaccurate GPS altitude
- Since Raspberry PI/ Stratux does not contain a shutdown switch out of the box, we modified the device. Pressing the red switch for one second triggers the command to shut down Stratux safely.
- An additional feature is the pre-installed OpenFlightMap Europe and/or VFR Sectional Charts US to be shown in the Stratux web interface. Those should be used for a quick overview only as maps are not updated on frequently basis.
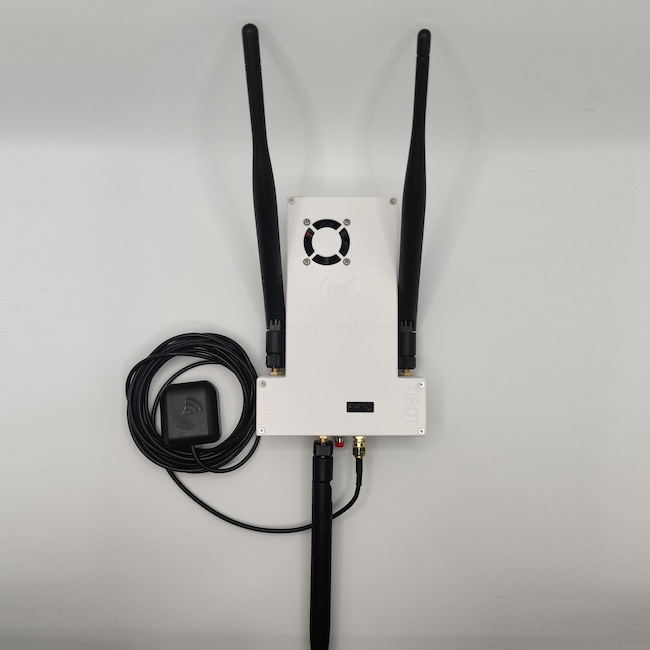
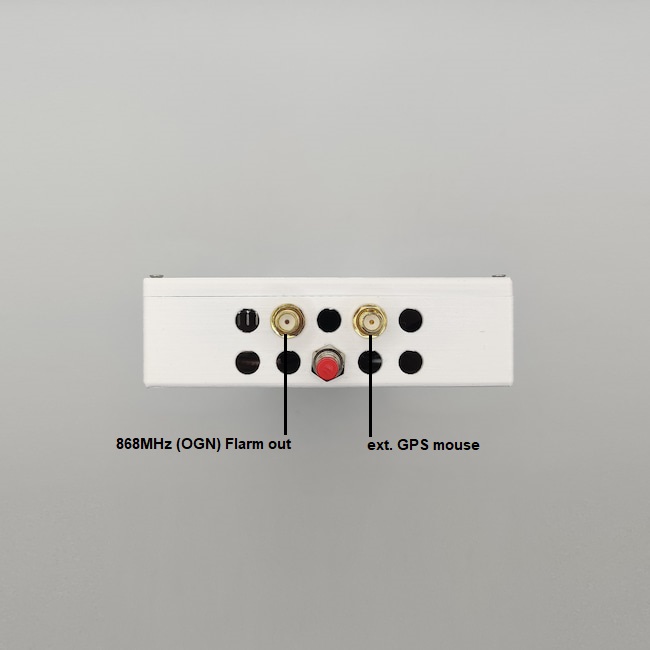
Stratux (OGN) Flarm with external GPS antenna
- female SMA connector on the right: connect to external GPS mouse
- female SMA connector on the left: connect to an antenna for 868MHz (OGN) Flarm OUT
- Please note that we do not provide any warranty of the "default" version of Stratux 3/ Classic Stratux if a "GPS no fix" problem occurs, as the standard built-in GPS antenna is very small.
🆕 Overview of "Advanced Dual Stratux" - send your own position via multiple Protocols
will be released soon!
- 🆕 Advanced Dual Stratux is exclusively developed by Dross:Aviation:
- similar to Stratux 3 "Classic Stratux", but with major improvements and updates! Such as:
- supports up to 2 transmitting units, to transmit (TX) multiple protocols at same time,
- optimized antenna position for less noise and more gain,
- smaller size of the case,
- better thermal dissipation
- receives (RX):
- ADS-L targets,
- ADS-B targets,
- OGN (Open Glider Network),
- PAW (PilotAware),
- Flying ad-hoc Networks (FANET) and
- Flarm targets.
- But also transmits (TX) its own location through:
- ADS-L, and
- Open Glider Tracking Protocol (OGNTP), and
- Flying ad-hoc Networks (FANET), and
- PilotAware (PAW), and
- Flarm
- this version of Stratux requires:
- 2 GPS Antennas (dual GPS to enable better accuracy) - two GPS antennas are also available internally to reduce space (please select in dropdown during order process).
- 2 TX antennas to send Flarm compatible signal, ADS-L, OGN, FANET and PAW
- 2 RX antennas: The long antenna without any description (two rings at the antenna end) must be mounted on the left as it is optimized to receive ADS-L, OGN, FANET,PAW and Flarm on 868MHz frequency (European version), US and Canada use the 978MHz antenna on the left. The 2nd long antenna must be mounted on the right to receive ADS-B targets. This antenna has one ring at the end and a 1090MHz printing.
- Suction cup antenna mount available to a mobile version of Stratux
- the optimized case now supports a suction-cup for a more flexible and mobile solution of Stratux
- Stratux contains a build-in GPS NEO M8N antenna
- contains latest ICM-20948 AHRS sensor version to support artificial horizon
- An additional feature is the pre-installed OpenFlightMap Europe and/or VFR Sectional Charts US to be shown in the Stratux web interface. Those should be used for a quick overview only as maps are not updated on frequently basis.
How to use
- 868/1090MHz antennas should be placed vertically (orthogonal to the horizon)
- GPS antenna should have clear view to the sky. Testing on the ground, e.g. in a car might result in less satellite reception. Also please keep in mind that reception in a car equals a faraday cage.
Therefore, you have to put your Stratux somewhere outside so that you get a GPS fix. Then leave it there for 30min so that the full sat constellation can be received and stored on the GPS which enhances the TTF (time-to-fix) next time. - Connect Stratux to a power bank by using a micro USB-B cable
- In case Stratux is connected to the electrical system of the aircraft: Stratux should be treated like a radio: first start the engine, then turn on Stratux. To shut down switch off Stratux first, then your aircraft's engine - this helps to avoid voltage peaks.
- It will boot-up automatically and create a WIFI network, named “stratux”
- Connect your smartphone/ tablet with this network
Access Stratux Web Interface
- Open the chrome browser and type the following IP address in the URL bar: http://192.168.10.1 or download the Stratux Manager App for Android.
- You can set the AHRS sensor orientation under the “settings”
- Now open your navigation app such as VFRnav, SkyDeamon or ForeFlight and chose Stratux/ GDL90 protocol to receive data from Stratux
Shutdown Stratux
- Since Stratux firmware version 1.6r1-eu026 (Sept. 4th 2021) the physical "shut down switch" is no longer required and therefore deprecated; you can now cut the power directly without any damage of the firmware/ SD card.
- The partition is now mounted to read-only, and therefore cannot write anything on the RAM.
- If you want to modify Stratux firmware (we do not provide any warranty in case of damage), you must disable the "persistent logging", by following those steps
By using our products, you acknowledge that you agree to our terms and conditions and disclaimer.